 Cut list:
2 pieces for the backpack 12"x15"
1 carrier front
2 Six inch pieces of binding
2 Pieces of cord 36"-60" inches long (depending on size of the child)
Here's my first try at a tutorial hope I can make it clear enough for you to make this string backpack with attached doll carrier for the little girls in your life. I used denim for my backpack. First I wanted the finished string backpack to be about 11"x14" so I cut 2 rectangles approximately 12"x15". These will make the drawstring bag/backpack that the doll carrier will be attached to.
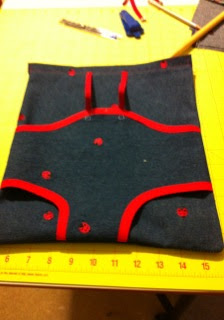
Cut out the front piece on the fold using a PDF file that I am still trying to figure out how to include here. This is what it looks like.

Use bias tape to cover the top and 2 leg openings. I used a binder foot for this and was amazed at how easy it was. I have discovered many new "feet" for my machine that make many things easier!!
Attach 2 snaps at the top of this piece about 2.5-3 inches apart.
Now I decided I wanted a one inch casing along the top of the bag portion, so I marked a line across the top of my 12x15 pieces of fabric 2 inches from the top. Snip both sides about 1/4 inch in. Fold this small piece in and press. Top stitch this so the casing edge is sealed. Fold the casing down and stitch in place.
Place the front doll carrier piece on one of the 12x15 inch pieces lining up with the bottom and sides. Baste in place. Sew the two 12x15 pieces together on the 2 long sides and the bottom. You need to cut four 2inch x 2 inch pieces of fusible interfacing. Iron these on the bottom corners to reinforce the fabric where the grommets will be placed.
Turn right side out.
Cut two strips of flat binding six inches long. These will be the shoulder straps for the doll. I sealed the ends of my binding with a lighter so they wouldn't fray. You could use fray ender also. Attach the other half of the snap to one end of the 6 inch binding. Snap to top of carrier. Sew the other ends along the stitching for the casing directly above the snaps on the carrier piece. These will not be tight, there needs to be room for the doll.

Attach grommets to the 2 bottom corners.
Now, you're going to insert the cord to draw the bag closed and to act as the backpack straps. Cord length depends on size of child. I use about 1 yard for each side on this example but the child I'm making it for is small. You may need a longer length. Thread the cord through opposite sides so they will gather when both are pulled. Thread them through the grommets and tighten to fit your child. I bought this cord in the macrame section instead of fabric. It was $2 for 15 feet and the cord in fabrics was around $1.49 a yard.
Add doll and adorable child and you're done!


